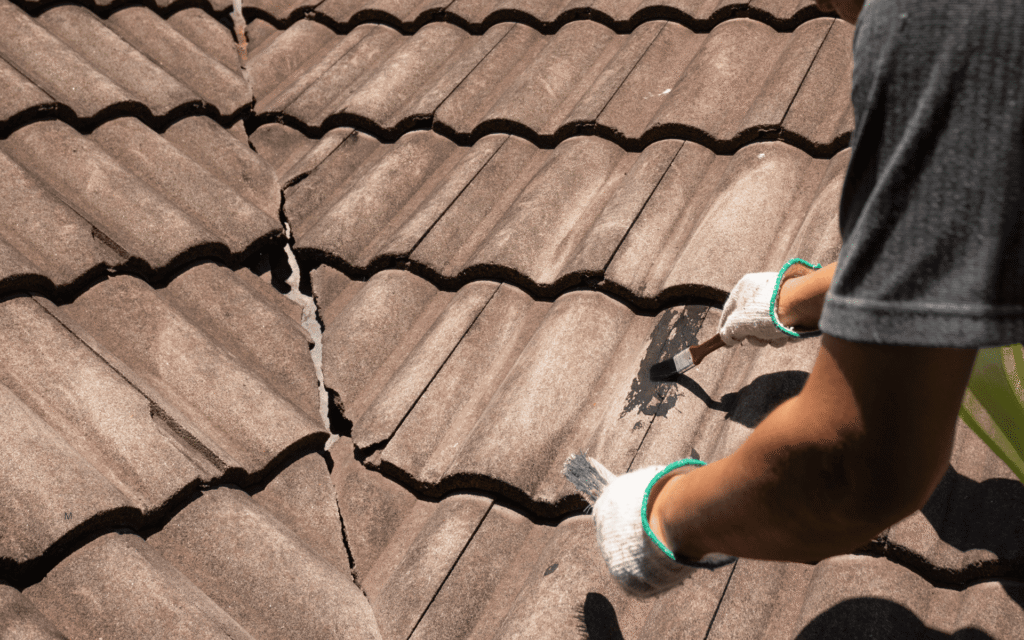
A cracked roof tile might look like a minor cosmetic issue from the driveway, but ignoring it on a Florida home can lead to serious problems like water damage, mold growth, and rotted roof decking. The good news is that if you catch it early, you can fix small surface cracks yourself with the right materials and guidance.
This guide walks you through everything you need to know about repairing cracked roof tiles to keep your home’s defense system rock-solid.
Why You Need to Fix Cracked Roof Tiles Quickly
Here on the Space Coast, we deal with intense UV rays, driving rain, and tropical weather. When a tile cracks, water quickly finds its way through to your underlayment. Over time, that moisture creates the perfect environment for mold and can rot the wooden structure supporting your roof.
Think of a cracked tile like a small leak in a boat. It starts small, but water always finds a way in until the problem becomes a massive, expensive structural repair. The longer you wait, the more it costs.
Common signs your tile roof needs attention:
-
Visible cracks, chips, or completely missing tiles
-
Brown water stains appearing on your ceiling or walls
-
Tiles sitting loose, sliding, or out of alignment
-
Algae or moss growing heavily in specific valleys
-
A damp, musty smell in your attic after heavy rain
5 Steps to Repair a Cracked Roof Tile
If you are comfortable on a ladder and have a relatively flat roof pitch, follow these steps to secure a cracked tile.
Materials needed: Roofing adhesive, wire brush, flat pry bar, replacement tile (if the old one is shattered), heavy-duty waterproof sealant, and safety gear.
Step 1: Inspect the Damage Safely
Set up your ladder on a completely stable surface. Before climbing onto the roof, ensure you are wearing slip-resistant shoes and a safety harness. Examine the cracked tile closely. Determine the crack’s length and depth, and check if neighboring tiles took impact damage as well.
Note: Always work on your roof during dry weather. Florida morning dew or leftover rain makes tile roofs extremely slippery and dangerous.
Step 2: Remove the Damaged Tile (If Necessary)
If the tile is shattered beyond a simple adhesive repair, carefully lift the overlapping tiles above it to access the broken piece. Use your flat pry bar gently to avoid cracking the good tiles nearby. Loosen the broken tile from the roof batten and carefully slide it out.
Step 3: Clean the Area Thoroughly
Use a wire brush to scrub away all dust, debris, chalky residue, and old adhesive from the repair area. This step is non-negotiable—roofing adhesive will not bond to a dirty or dusty surface. Brush away the loose material and make sure the surface is completely dry before moving to the next step.
Step 4: Apply Adhesive or Install the Replacement
-
For repairable cracks: Apply a heavy-duty roofing adhesive directly along the crack line. Press the edges together firmly and hold. Smooth any excess adhesive with a trowel for a clean finish.
-
For replacement tiles: Carefully slide the new tile into place on the roof batten, making sure it hooks properly and aligns seamlessly with the surrounding tiles.
Step 5: Seal and Inspect Your Work
After the adhesive dries (always check the manufacturer’s instructions for cure times), apply a clear, waterproof roofing sealant over the repaired area. This creates a secondary barrier against wind-driven rain. Inspect the finished repair to confirm the tile is locked in securely and sits completely flush.
Preventing Future Tile Damage
Proactive maintenance saves you thousands in premature replacements. Here is how you can protect your tile roof year-round:
| Prevention Method | How It Helps Protect Your Roof | Recommended Frequency |
| Visual Inspections | Catches small cracks before they rot your underlayment. | Twice a year (Pre & Post Hurricane Season) |
| Gutter Cleaning | Prevents water from backing up under the eaves and rotting fascia. | Every 3-6 months |
| Tree Trimming | Stops heavy branches from falling and shattering tiles during storms. | Annually |
| Professional Assessment | Identifies failing underlayment or loose flashing you can’t see from the ground. | Every 1-2 years |
Get an Honest Assessment from Your Local Experts
At Yeti Roofing, we know that dealing with roof repairs can be stressful. If you have cracked tiles, a failing underlayment, or a leak you just can’t track down, you don’t need a pushy salesman—you need a professional, honest assessment.
We pride ourselves on doing things the Yeti way: Fast. Professional. Done Right. Whether you need a precision tile repair or it’s time for a full-scale replacement, our Palm Bay team delivers premium craftsmanship without cutting corners.
Don’t let damaged tiles compromise your home’s structural integrity. Contact the local experts at Yeti Roofing today for a free, no-obligation inspection.
FAQ
Can I repair a cracked roof tile myself?
Yes, if it is a hairline crack and you are comfortable working at heights, you can repair it using roofing adhesive and sealant. However, if the tile is on a steep pitch, the underlayment is exposed, or multiple tiles are shattered, it is always safer and more cost-effective in the long run to hire a licensed professional.
How much does it cost to repair cracked roof tiles?
DIY materials usually run between $20 and $60. Professional repairs vary depending on how many tiles are broken and if the underlayment beneath them needs to be patched and resealed. Honest contractors will always give you a transparent price before starting the work.
How long does roof tile adhesive take to dry?
Most high-quality roofing adhesives are dry to the touch within 2 to 4 hours, but full curing takes 24 to 48 hours depending on Florida’s humidity. Never apply adhesive if rain is in the forecast for that afternoon.